Thursday, April 12, 2007

Final Project Development

This blog is just to outline the process for my final project over the past few weeks.

It is called SMS - the Secret Message Sweatshirt. (props to Amber Reed for the name)

What it is:
A system for personal expression, embedded in an everyday hooded sweatshirt. The system uses thermochromic ink, fabric swatches, conductive thread, conductive Velcro, conductive fabric tape, wrapping wire, and rechargeable lithium-ion batteries.

It is designed to be wearable, modular, durable, Eco-conscious, low-Tech, easy to use, easy to adapt, and most of all, fun.

A break down of the elements as I see them currently:


So, to explain in brief: The battery (encased in a secure but removable pouch in the pocket) is connected to a button switch, that, when activated, will send current to the conductive thread patches, which will heat up, and thus change the color of the ink on the patch, revealing a message/symbol/etc.

The ink changes color from black to clear, so the message underneath will have to be painted on the fabric beforehand (as the fabric color itself is black as well).

The complicated part of the process is getting the right amount of current to the patch, in an effective way. Too much current, and the patch will get too hot and possibly spark or short circuit; too little, and the ink won't change color at all.

The trick is resistance. The conductive thread heats up more effectively with greater resistance; different types of conductive thread have different resistances, so I have tested a number of different types:

Initially, I thought that sewing a circuit path from the battery to the patches with conductive thread would be feasible, but after experimentation, I realized a few things:
1. The entire length of the circuit would get hot, becoming very uncomfortable or even dangerous to the wearer.
2. By expending heat along the entire length of the circuit, I was reducing the effectiveness of the circuit by the time the current reached the patch.
3. By using wrapping wire to connect the battery to the patch, not only would I create a more stable connection, but I would reduce the heat loss, and potentially create a faster reaction time in the patch.

So, I switched to wrapping wire, as it has a few properties I thought were desirable:
1. It is insulated, allowing for effective current transfer without heating up.
2. It is thin enough to be stitched, or fastened in a way that would not reduce the comfort or wearability of the garment.
3. Less expensive, more reliable.

Now, the only thing left is to put it all together.

I have the hand-stitched battery holder with velcro:

The wrapping wire:

The materials : conductive fabric tape, conductive thread, conductive and regular velcro, and fabric patches (not pictured: thermochromic ink, textile ink, sweatshirt)

Now to put it all together in the grand finale!

Tune in soon to see how it all turns out.

Friday, March 02, 2007

Week Seven: Hand made conductive velcro

This week was focused on making a soft switch and coming up with questions for the trouble shooting class. Since my final project will (I think) invlove the use of velcro as switches, I wanted to make sure I could succesfully make one without too much problem. I had ordered some conductive velcro online, but it was hijacked by the United States Postal Service - I almost got in a fight with the guy at the post office, bu that's another story.
I took this as an opportunity to see if I could use regular velcro and conductive thread to make my own switch. I started by obtaining some regular velcro and mapping out my circuit. I reasoned that I could sew conductive thread through both sides, making a positive and negative 'patch' on each half of the velcro, thus completing the circuit when the two pieces were fully touching. The real struggle I had was the actual sewing of the thread through the velcro. Velcro is really tough to get through, espcially since the only needle I have that is big enough for the conductive thread is also dull. I ended up poking holes in the velcro with an xacto knife, then pushing the needle through the hole that way. As soon as I figured that out, the rest was no big deal. The other innovation I had was to sew the patches in such a way as to indicate their polarity (i.e. the positive side was a + shape, the negative a - shape). This turned out to be a real time saver when I was testing the switch.

Top View

The inside: note the + and -

Coin cell on the left, LED on the right

Side View

Once again, I really enjoyed this week. I'm very relieved that I can make a velcro switch without the stuff I ordered, just in case it never comes. It was good practice for my final, and I may end up using non-conductive velcro with the thread anyway, as it was a relatively cheap and simple solution (the conductive velcro is really expensive).

Week Five: Penny Switch

The assignment for week five was to create a device that addressed our senses. I struggled a little bit deciding on an idea, because the materials I was planning on using had not come in the mail yet.
I started just experiemting with really minimal elements that I had around me: conductive thread, pennies, led's, etc. Keeping our senses in mind, and keeping to my theme of hand-based switches, I eventually thought of making a switch that would use the pennies as contacts, transmitting the current along the conductive thread to light an LED - I really liked to minimalism and the exposed nature invloved. So, strategically placed the pennies and LED on my hand so as to light the LED when I gave someone the finger - definately a shock to the senses. The switch also had a really interesting consequence: because I put the battery directly against my skin, it gave me a tiny shock whenever I closed the switch. So it ended up being a reward/punishment sort of behavior modification switch; if you want to give someone the finger, you have to endure a shock, but you get to see an LED light up, which is stimulating.
Here are some pictures:

pardon the gesture...

The mechanism.


The thing I really enjoyed about this week was appreciating just how difficult minimalism and simplicity can be. It took a long time to get the thread, pennies, LED, and battery working together -- the positioning of the thread so as not to cause a short turned out to be a serious task. Overall, very enjoyable -- even getting shocked.

Week Four: The Light Glove

This week our assignment was to hack a toy, and make it into a wearable object. I went to K-Mart and picked up this neat spy toy that used some basic LED's and fiber optic cable to make a hand's free 'flashlight' of sorts.
I basically took apart the whole thing, down the circuit level. I kept the LED's, fiber optic cable, button switch, and finger hooks. I picked a fingerless glove I had so I could utilize the cool finger hooks that had come with the toy. I thought they might come in useful for a future project.
I soldered some stronger wires onto the switch, and threaded the wires through the cuff of the glove. I sewed the switch, LED's and plastic piece in place, and attached the wires to a coin cell battery on the inside of the cuff to hide the power source. The results were pretty cool:


In all, I really enjoyed this assignment - you can really get some great ideas just from taking apart what other people have already done.

Saturday, February 03, 2007

Week 3: First Fabrication Foray

Week 3: First Fabrication Foray

The assignment this week called for us to design and build something with the following components: a normal, non-conductive fabric (i.e. cotton), a conductive fabric or thread, and an electric component. Oh, and it had to be wearable.

I had done some design work with sweatbands before, so I opted to continue the trend. I experimented with a few different types of conductive fabric, along with various potential circuits and physical computing components. In the end, I came up with this:


Top (LED on the left)


Bottom (Button & Conductive Thread)


Basically, I was inspired by my childhood toys to create a sweatband LED zapper. The LED is pointed forward when you wear it, so that you can aim it, push the button on the bottom and 'zap' your enemies. Needless to say, I had a lot of fun with it before it broke.

The design was achived using a simple LED, switch state button, conductive thread, and a 3V coin cell battery. The design was relatively simple, as the thread simply acted as the wire would in a normal curcuit.

However, the thread I was using was actually pulled threads off a piece of Organza I had been experiemtning with, since I had no proper thread, I had discovered the possibility taking out the conductive fibers from the Organza and stitching them into the sweatband to create what was essentially conductive thread. Unfortunately, the threads from the Organza were significantly weaker then traditional conductive thread, and while I was able to get the curcuit stitched and present it in class, the thread broke when I attempted to put the sweatband on. In all, it was a very fun project, and really got me excited to work more with conductive fabrics.

I was also inspired by the E-Broidery article, espically the overview of applications section. The fact that there are people out there who are developing and using these materials in such interesting ways just illuminates the face that there are so many possibilities yet to be explored. Being a musician, I particularly enjoyed the musical jacket and keypad idea, though the keypad immediately sparked thoughts of a 'soft' mobile phone or social networking device. (Potential project?)

Week 1 & 2: Intro and Venus

So, it's a bit overdue, but here it is: my first real wearables blog. This post will cover the first and second weeks thoughts, readings, and projects.


There are two main reason I decided to study wearable technology: first, I see I lot of very interesting possibilities in the realm of portable, comfortable devices; secondly, I think it's crucial to able to design with the human body in mind, becuase given an option, people will pick the product that feels right.
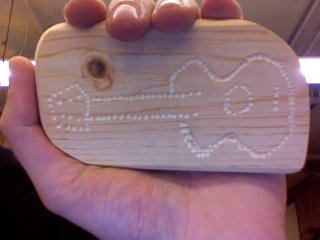
So with these thoughts in mind, I took on the task of creating my own Venus of Willendorf. A few things struck me about the Venus . It seemed to be an object that fit well into the hand, was comfortable to grasp, and I thought of all the things that only our hands can do. Thus, I decided to take a block of wood and carve it to fit specifically in my hand. I chose wood because, besides being nice to work with and nice to hold, it also changes over time, absorbing oils and moisture from the body, effectively taking on some aspects of its owner.

The hand, as it turns out, is a rather complicated piece of machinery. I hand to debate what sort of hand position provided optimum comfort and stability. After quite a bit a meticulous carving and sanding, this is what I came up with:

Front

Back

The guitar, meant to symbolize an important, personal (but non-portable) object was hammered into the wood using a metal punch. As you can see, my drawing skills leave much to be desired. However, the shape and the grooves for the fingers and palm proved to be quite effective in nestling the wood into my hand.
I thought this was a great excercise; I spent a lot of time just thinking about my hands, the impressions they make, the spatial relationships that work well with them, and how hard it is to make an object that works for one hand, let alone many.

As for the first set of readings and discussion, a few points stuck out in particular for me. In the Fashion article by George Simmel, I was particularly interested in his discussion of fashion as it relates to class, espically in light of the time in which he was writing versus today. The idea that fashion trends are set by the rich and immitated by the poor certainly has some credibility; just think of all the direct imitations of pricey label items (Louis Vuitton bags, Oakley Sunglasses, fake diamonds, etc.). However, while this is still certainly true, today there are some striking counter-examples. For example, the prevelance of 'urban' style (baggy pants, oversized shirts and jerseys, sneakers), or the rise of pre-ripped or dyed jeans that make them look old and worn right off the rack. These are certainly not styles inspired or designed by the upper class.


Friday, January 26, 2007

Wearables - Blog Numero Uno

This is a journal for Ben Leduc-Mills' wearables class at ITP.